Pumpkin floral centerpieces are a beautiful, festive addition to any holiday table. Learn how to make them (and use every bit of the pumpkin in the process) in this guide!

All tagged Fall
Pumpkin floral centerpieces are a beautiful, festive addition to any holiday table. Learn how to make them (and use every bit of the pumpkin in the process) in this guide!
Sunflowers are the first flower I remember growing, so they are special to me. I know I’m not alone, as so many people love the happy yellow faces sunflowers have to offer. If you’re a designer, though, they can be quite difficult to work with! In this video, I’m going to demonstrate how to create a sunflower wedding bouquet, specifically in a cascading shape.
In this fall-inspired centerpiece tutorial video, Kelly pulls together an arrangement using gomphrena, zinnias, foxglove, pokeweed, asiatic lilies, hydrangea, and dahlias. Learn how to become a florist and take floral design classes online with Team Flower. Here you can even learn tips on flower gardening for beginners. We'll show you how to do flower arrangements in flower arranging videos.
Transcript
Hey there. I'm Kelly Perry with Team Flower, and today I'm going to do a little centerpiece demonstration for you using beautiful peach, pink, white, orange flowers. I hope you enjoy it.
We're going to get started today with some pokeweed. I love using this in the summer time. And we are going to use this to establish the shape of our arrangement. So you can do this with any kind of flowers. You just have to think through, what can I use that serves a similar purpose?
So you don't have to use pokeweed whenever you go and try this at home. You can use something else that has a similar function.
It's really fun. Everybody's regions are so different that are here with us on Team Flower, and it's fun to see what you guys are using in your neck of the woods. And I would love to hear more about what you have in your yard.
I'm using a flower frog today, and I have it attached in there to my compote dish with some epoxy. Now, it will not come out if you decide you want to go that route. It's kind of a permanent thing. But I really like to-- I really like to have them in there good and stuck.
OK, so that's our basic shape. Next we're going to work on covering some of this area down in here, and then we're going to build it up with beautiful flowers. I'm going to use some geranium leaves, and I'm going to use a little technique called layering, where you simply layer the leaves one on top of the next. And I'm going to work that back in and through the arrangement to get a little bit of a line going.
Every time you put a flower in you have to think about, OK, where's the next flower going to go that's going to balance that one out. So it doesn't necessarily have to be the exact same flower that you use to balance things, but you just need to kind of keep that in mind so that you don't get lost along the way whenever you're making your arrangement.
So when you step back and evaluate regularly, you'll catch when things are kind of going in a direction that you want to change or edit.
So just low in the arrangement, these little guys in there. And then I'm going to do the same thing with some hydrangea.
You definitely don't want to miss this step of building the shape and getting the shape to a place where you like, and then working on this covering aspect is really important. So that gives a place for all the rest of your beautiful flowers to shine.
I have two different kinds of hydrangea that I pulled, and I'll see which one I like in here better. But they have different shapes, and so they can be used in different ways. Like this one is more round, and this one really lends itself to being able to be cut pretty low and tucked deep inside.
Sometimes hydrangea can be a little bit overwhelming because it's so large and round. So I like to pull it apart in different sections, kind of use it in this way. Also looks pretty as a mass grouping. Like a lot of hydrangeas all in one place, I think is another way that you could use them.
I'm getting close to where I feel like I have an adequate amount of coverage, and that I'm ready to start pulling this color from down here up into the arrangement with some foxglove. This is called pink dalmatian. It's really sweet variety.
And I'm going to use this to bring color higher in the arrangement. It also reinforces the shape of the arrangement. And I love how it's going to act as a transition flower, taking us from the peaches that we have-- or the pinks that we have-- to some peachier tones.
It's little speckles in there are really sweet pink. And as I'm choosing the flowers, I'm thinking about the shape that they naturally have. This one would really lend itself to kind of going out this way. So that is where I'm going to put it.
You don't want to be fighting the natural shape of the flowers or you'll have a hard time getting everything where you'd like it to be. But if you need to just zhuzh it a little bit, you can kind of go like this, soften the stem-- stem fibers a little bit. It's especially helpful with things like tulips.
Tulips are wonderful, aren't they? I cannot wait to have those back in the spring. So many different varieties. Love them.
Next we're going to use zinnias to create a line. You could also use ranunculus, but if you are in a situation where you need to have two different options for a bride because you're working, maybe, at a different price point, ranunculus of course are more expensive. These can range anywhere from like $1.30 maybe to over $2 a stem, depending on the time of year.
And then there's zinnias which you can get from most cut flower farms. And these are kind of one of those more, like, two or three for a dollar flowers. But very similar as far as shape and kind of, the way that you could use them. I really think that zinnias rival ranunculus in the summer. I think they're so sweet. Absolutely love them. Would choose them over ranunculus every time.
What we're going to do with these is create a little bit of a line in the arrangement. And I'm just going to take notice of the size and the shading on all of the ones that I have. These ones are a little bit more peach so they'll look prettier together in a group. Hmm, these ones have more of a pink and white tone, so those would look really pretty, like, next to some pokeweed because it has those same tones in it,
Have some white. This might be pretty up there near the foxglove. There's a little touch of white up there. This one coral piece that's really pretty and bright. That might look pretty low in the arrangement next to something peach. So we'll start there.
And I like to observe how they look from different angles because want to put them in a place that really showcases their special shape and coloring.
Now what we're making is called an implied line. It's a connect the dots kind of line. And that helps to guide your eye through the arrangement.
So you can start implied lines anyway that you like. They're really fun. It's kind of the unscripted part about this, in these more organic style arrangements. You can make up the path that you want them to go in and decide based on how their stems fall and all those kinds of things.
This is a pretty strong vertical implied line right here. Not something that I normally do, but I want to play with it a little bit today and see where it goes.
There's my frog. [LAUGHS] So I like how this kind of comes down, and then it pops back over and up to these ones and then around the side.
So again, you could do something very similar with the ranunculus if you wanted to. I just wanted to have those here as a little example for you so you could be thinking about it. And I have some dahlias.
It's good to work just one ingredient at a time. Helps you to focus and see how things are falling sometimes when there's all these buckets of flowers in front of you, and you're like, oh gosh, where do I even start? You just need to get everything organized in the way that you're going to put it into the arrangement. And then don't think another thing about it.
Start with what you're going to use to create your shape then what you're going to use to cover, like we used the hydrangea to kind of cover the bottom and the geranium leaves. Just put everything in order.
OK. I have another line going here. I really like lines. They keep the-- sometimes the organic arrangements can start to look a little bit messy, and the lines keep things organized. I really love, love, love, love lines. Super, super important.
OK, are big star of the show is this Asiatic lily that I found from Peterkort. They grow a lot of roses but I happened to see these, and I was like, oh, please add a bunch of those to my box. So I'm excited to play with these and see how they come together.
I think the coloring in them is so lovely. This really just-- oh, rich, rich, brown red. And I love how that plays with the richness of the insides of these zinnias. It's one of the reasons why I wanted to choose those over the ranunculus today.
Mm, those look so pretty with the zinnias.
I think lilies get overlooked sometimes. We need to bring them back. They're beautiful flowers.
I'm kind of wanting to work one in high. I'm going to try it and see how it looks. Might be too much, might be awesome. You always have to give it a whirl. And of course, beauty is one of those things that's a little bit subjective. Some people might love it and think that it's awesome, and then others are like, whoa, where'd that come from. So you have to decide-- you have to decide what you love.
And that's what really makes your mark, and makes your work unique. Everybody worries about, oh, what's my look? What's my look? It's just naturally what you think is beautiful. That will become your look. So you don't have to over think that a lot. Hopefully that takes some pressure off.
I'm going to leave it there for now. Something I like to do at the end of the arrangements, just take a quick little iPhone picture of it. So maybe I'll do that and see if I want to leave that in there or take that out. But I'm OK with it for now.
Last thing I'm going to add is gomphrena. This is something that a lot of the local flower farmers will grow. And you can dry it, so it does really well as a cut. A lot of things that you can dry will do well as cuts, and in boutonnieres and things like that need to be out of water.
These do have some wilty stems if they're cut at just the wrong time, so just be cognizant of that and do a little test run if you wanted to use these in boutonnieres or something like that. They're kind of like zinnias. If they're cut just a little bit early, their stems can get floppy and they don't hold as well.
The purpose of these little finish flower, what adds that little bit of lightness to the arrangement. Some other things you could use with these lilies, chocolate scabiosa or black cosmos would be pretty.
Now, we talked about that implied line. What this is doing in the arrangement is an actual line. That's the two different kinds.
And I do like this little bit of negative space that I have going in here. I kind of want one other thing that's up just a little bit higher so that it's not at the same level. So let's see if we can get that, and if not maybe we'll just pull that gomphrena and make it a little bit shorter, and have that be the high point in the arrangement.
OK, I we're just about done. Add one more over here I think.
OK. As always, after you put something together it's a good idea just to walk away from it for a few minutes and just check it. You might come back and look at it and see something else that you want to just change a little bit. So whenever you're going through and practicing this, just feel the freedom to, at any point, walk away if you need to and come back. A lot of times that gives us a lot of clarity.
So we'll just review the flowers real quick and the purposes of them in the order that we put them in. First it was the pokeweed. And that served as our shape. Then we put in some pink hydrangea, and that helped us cover the base of our arrangement and also added a little bit of structure and stability because it has all those different-- just the shape, you can put flowers down through to help hold them hold them all in.
Then we added some geranium leaves to cover the bottom as well. And then from that, we built up and we started using some zinnia-- or you could use ranunculus-- to create an implied line. After that we went for the dahlias. And we created another line, both on the front and the back, with the dahlias.
And then we added in some of these beautiful Asiatic lilies. And finished it off with gomphrena. And I forgot the foxglove. That came after the geranium. And that's-- I think this is called the dalmatian, peach dalmatian.
So there you have it. I hope you enjoyed this little centerpiece tutorial as much as I did. Get out there and keep moving forward one step at a time. Happy to be a part of the process with you I'm Kelly Perry with Team Flower. Have a good day.
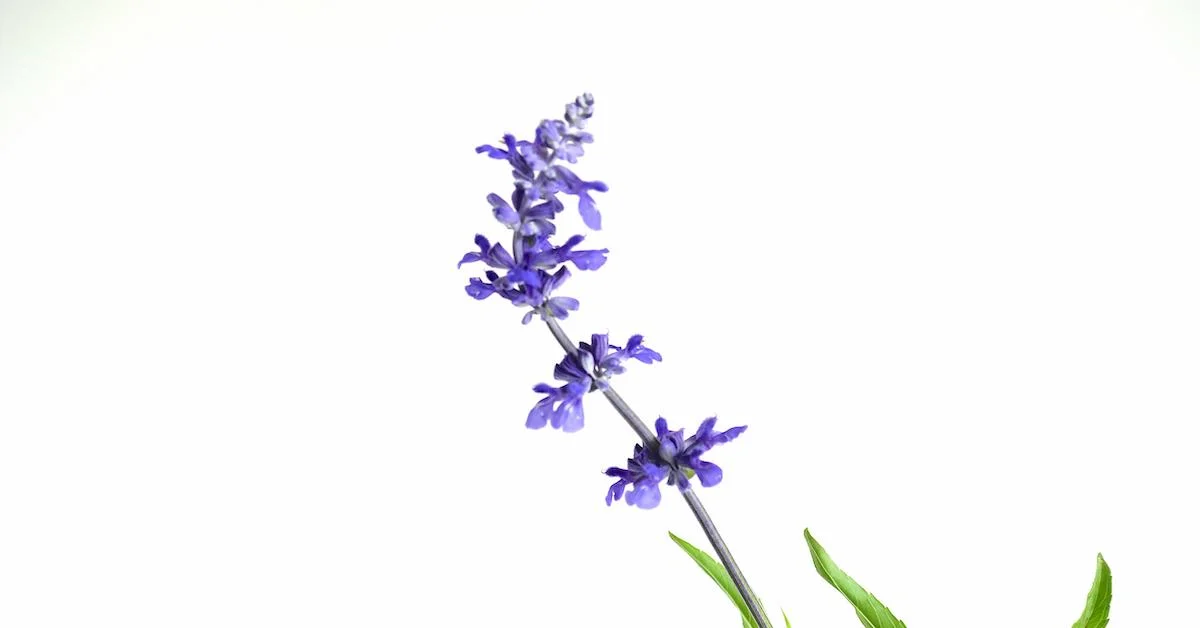
In this video, Kelly’s here to give you some fun facts about salvia! Salvia is a great flower to take color to the edges of your arrangement. It is a perfect substitution for veronica as it serves a similar purpose in an arrangement. It’s also a rose companion plant, so if you’re growing garden roses, salvia will be your friend! Want to grow some yourself? You can find the seeds at Park Seed.
Anything new that catches the attention of my local audience is a plus! I also love to get people thinking while they're looking at something pretty—it adds dimension to their enjoyment and increases the chances they'll be back to buy from me again.
In this video you'll hear how Kelly approaches bridesmaid bouquets. Typically, the bridesmaid bouquet is a scaled back, smaller version of the bride’s more intricate bouquet. While often times the bridesmaid bouquet uses many of the same ingredients as the bridal bouquet, there are instances where the bridesmaids only utilize greenery so that the bride’s flowers pop even more. Ultimately, that decision is up to you - the designer!
In this video we are going to make a late summer, three-level bouquet! Watch to see how Kelly implements design principles with each layer in the arrangement.
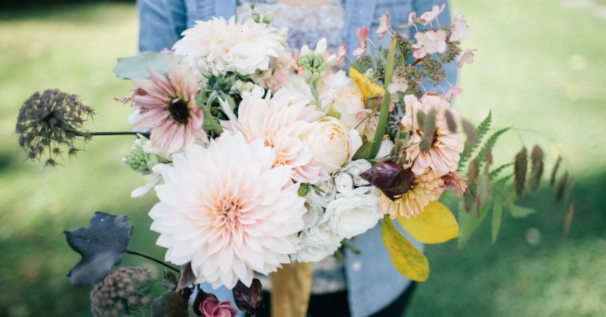
My favorite bouquets always start with a walk in the woods and end at a local flower farm. It’s there that I find ingredients that are not only unique and special like my brides, but these ingredients speak to the present moment. I think that’s really special. Here is a behind-the-scenes look at what goes into a bridal bouquet and the ingredients it calls for. I hope it inspires you as you plan your wedding!