Join Kelly as she goes through a free 4-part quick tip video series on designing a centerpiece. She discusses designing for a table, using the lines principle of design, and shows the ingredient use and purpose. Watch these completely free video lessons.
------------------------
Video transcripts
Hi, I'm Kelly Perry with Team Flower, and I'm here to show you a few quick tips for designing on a narrow rectangular table. If you have a client that wants a long, full, lush, centerpiece, or you're doing a styled shoot and they want something larger, it can be a little bit tricky to fit all of the things on your table that you need to, cups, glasses, flatware, plates, and you, of course, want it to be beautiful, but you also want it to be practical for your guests. I think that's really, really important.
So, I have just a few tips for you if you're wanting to go in this long and lush direction. The first one is to use a centerpiece container that has a little bit of height to it. So, maybe you're doing a bowl, but it has a little pedestal and then the bowl is on top. What you're looking at right now is pretty low. There's no pedestal on this bowl. It's just a bowl with a small little lip at the bottom. And what we're running into problem wise with this, is that the flowers are kind of just invading this space. There's not enough distance between the plates and the flowers.
So, we want to create a little bit more space. And I'll show you the difference that it makes just to add a little lift underneath your arrangement. So, now you can see there's a considerably larger amount of room between the plate and the flowers, and so the guests can easily access their dinner, and cups and things like that fit in a little bit better. The next tip that I have for you, is to do a little mock setup before your event and before you start designing. So, if this is for a wedding, just set up a table similar. If you're working with an event planner, or cater, or whatever, just ask the dimensions of the plates that will be used.
You want to be mindful of chargers. Sometimes, you know, you'll get there and oops, surprise! There's chargers, and on a narrow 30-inch table, you cannot fit chargers end to end, and then also, you know, really large centerpiece. So, that's something to consider during the design process when you're working with your client. If they mention charger, you have to kind of ding, ding, ding, remember. It's going to be difficult to fit all that on the table. So, you can set up in your studio, just a quick little-- maybe with a little pop-up eight foot or six foot table, whatever they're using, or round six foot table, just to get an idea of what you're looking at.
If you don't have those tables, you could do a little visit to the venue if that's practical for you, and you could kind of chart out and set it up, and see what dimensions your flower arrangement should be. So, that way you know if you control your greenery out a little bit more, if you need to tuck it in more. But the most important part with these narrow, long tables, is this section right here. You want this to be pretty narrow. So, tip one, you know, popping it up a little bit higher, tip two, having a little mock setup table. Now, what's great about this, is you're making your first arrangement, you can sort of, examine how the cup-- the cups are kind of the thing that, a lot of times, will get in your way.
So, if you have the height and width of the cups and you can set that up, you can sort of trim out of your arrangement, little pieces that are interfering with the guest access to those elements of the table. So, this particular pokeweed berry is touching the glass, and I just want to get that out of there, so that it's comfortable for my guests. So, just a small adjustment-- maybe we get rid of this leaf as well-- it makes a big difference, and that'll save you a little bit of time whenever you go to set everything up. It helps the event planner or the caterer be able to access those things easily.
You don't want to be the florist that always has flowers in the way of other people's jobs, and just practicality is important. So, those are my two quick tips for you. Get the level up, and then set up your little mock table, and that'll help you get an idea of the general size that you need to go for. And then you can also clip things out before your arrangements head out the door, just a little bit of quality control to help you make things a little faster on event set up day. I hope you enjoyed this little video, and if you'd like to see more, you can visit teamflower.org/free. I'm Kelly Perry, thanks for watching.
------------------------
Hi, I'm Kelly Perry with Team Flower. And I am back with a little flower recipe for you. This might be a great option for a bride who would like something that has just a little hint of fall in the air but is still nice and summery.
It's late August here in the mountains. And I think that these colors are really just telling of the season and the time of year that it is. We have some of these pinks, and we've paired them with some-- just a real rich orange that just has that little bit of a knod to fall, which is fun.
So the leaves have started changing colors. And this color palette just reminds us where we are in the season. So I just wanted to go through and tell you a little bit about each of these ingredients. You might find a way to work them into your garden, or into an arrangement that you have coming up soon.
So the first arrangement that we're going to start out with is pokeweed. It's this right here. And it has little pink and green berries.
Later in the year, they turn into a very dark purple. Once they hit that stage, I don't use them in arrangements anymore because they stain pretty bad. So I just like to avoid that liability.
But whenever they're at this stage, they're really, really great to use. This is something that just grows wild. And it's weedy here in Boone, so it's easy to come across and a great way to fill an arrangement. And next, we have some snapdragons here-- these little pink guys. And I love how they pull the color out wide into the arrangement.
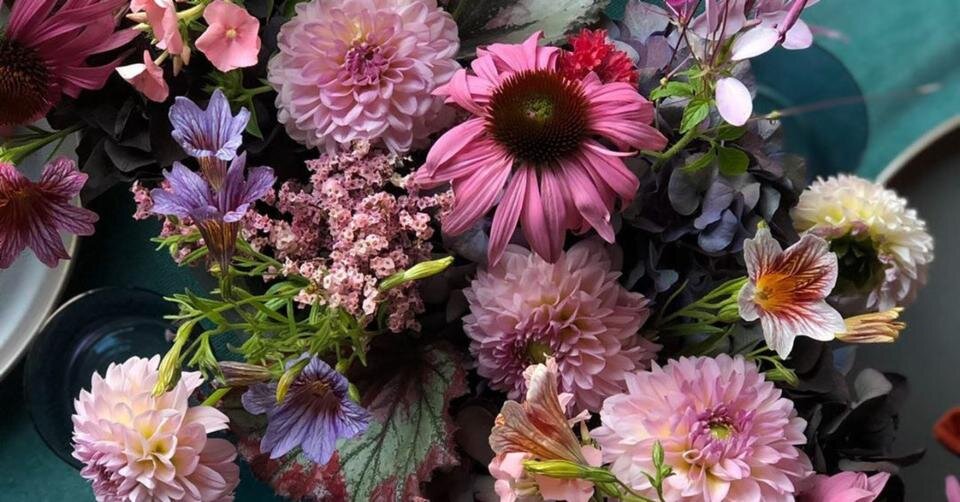
These little orange guys here called gomphrena. And they come in a carmine pink and white lavender. So there's a lot of fun color options with these. They have just really nice texture and just that little knod that you can use as a finishing piece.
I'm quite a bit of lisianthus in this arrangement. This variety has a nice dark burgundy center, which I love how it just captures what's going on with these queen redline zinnias-- one of my favorite zinnias. and then I have the burnt orange dahlias deep in the arrangement here.
And if we flip over, I just have one other variety of dahlias that we pulled from Darlanna Besecker's farm, Hope Valley Gardens. So here is another variety, that dahlia. And then I missed our little base in here.
If you look in real deep, there's some limelight hydrangea and then, also, some sedum. So that is my little quick flower recipe for you. Hope you enjoyed it. And if you'd like to see more videos like this, you can visit teamflower.org/free. See you soon.
------------------------
Hi, I'm Kelly Perry. And I wanted to take a few minutes to talk about one of my favorite design principles, and it is, lines. It's never fun to stand in lines and wait. But it is so fun to see lines in your arrangements.
There's two different kinds of lines we're going to talk about today. One is actual and one is implied. As you can imagine from the definition, an actual line is what the stem creates. It is a line that you follow with your eyes. So you can see it right here in this little piece of gomphrena.
Implied lines are like connect the dots lines. Maybe if you think about a starry night, all the different constellations and how we use those stars to connect the dots and to create a picture in our mind, that is what an implied line would be like. So I just wanted to show you how I used flowers in this arrangement to create some lines.
So of course, we just talked about the gomphrena and how we have this little bit of line here. I love to use maybe ranunculus, or things that have a little bit of a curvy stem or some interesting stems that can add some interest to the arrangement. This one's pretty straightforward. But we have some nice curve lines going on with the implied line.
So let's talk about the first one that's probably most obvious in this arrangement, and it is the zinnias. These are queen red limes. We start our line right down in here. And you can see they're at different levels and the direction that their faces are pointing are a little bit different to add some interest.
So we have one here, here, here, here, and here. So this is one of our implied lines. Now, the next one we're going to talk about is the line that is formed with these burnt orange dahlias. So it starts down in here, and it pops its way up.
So here is another implied line. Another one would be here with this lisianthus. We're going this way.
And this one's more horizontal as opposed to curved like these ones were. And I'll flip the arrangement around. You can use different flowers to create the lines on different sides of your arrangements if you want to add some interest and variety in the flowers to your arrangements.
So in this one we have dahlia's going in a little line like this. And then, lisianthus, again, we're using to go here. And then over here.
The great thing about lines is they guide your eye through the arrangement, and they invite you to keep looking deeper. So that is what I'd encourage you to do today. Consider how to add some lines to your arrangement, and always be thinking about how you can think deeper.
Hope you enjoyed this lesson. If you'd like to see more, you can visit teamflower.org/free. Thanks for watching.
------------------------
Hi, I'm Kelly Perry with Team Flower. And I wanted to do a little bit of a different take on a tutorial. A lot of times, we see the arrangements come together step by step, but when we actually look at them in real life, in a photo, they're already completed. And it's like, wow. How did they get there?
So I wanted to have a completed arrangement for you today. And I would like to pull it apart piece by piece. I'm going to go backwards, I'm going to show you the last thing that I put in. We're going to just slowly work our way out until all we have remaining is our container. So this will be a really fun one. I hope you enjoy it.
The ingredient that we're going to start with is this gomphrina, up here. So, I'm just going to start pulling it out in the order that I put it in. I like to use this as the final little bit of movement in the arrangement. So, you can take a little snapshot in your mind and see how removing this ingredient changes it. You could still do something like this if you had a bride who wanted something maybe just a little bit more tailored, less sculptural. Just deleting this one ingredient gives you a more tailored look.
Next, I'm going to pull out some of the focal flowers that I was working with. And, back here, they were the dahlias So the dahlias are going to come out and I'll show you what it looks like without those dahlias in there. And then on the other side of the arrangement, we were working with zinnias as the focal. And you can see them right here. So I'm just going to tug those out. And then I'm going to go in and pull out the lisianthus So you can take just a quick little peek of what that looks like without those dahlias and without the zinnias. And I'll start pulling out the lisianthus Everything comes together one step at a time, no matter what it is. Flowers, cakes, books-- just a series of steps. Homes. All of those things.
So, it might seem like a daunting task at first, but as you just start deconstructing it and thinking about it a little bit differently, it becomes, in a way, a little bit more attainable. Which is fun. So if I get overwhelmed, I kind of like to step back and think about all the steps it took to get there.
OK. Next, I'm going to pull out the burnt orange dahlias, here. And now I'm really getting down to the base material of the arrangement. These ones that I've been pulling out-- the dahlias and the lisianthus-- I would consider the accent flower. So, those are gone. Next I'm going to pull out the snapdragons. These were used to carry color to the sides of the arrangements. Missed a zinnia.
And now, we're left with the pokeweed, which creates the shape. And, then, the hydrangea and the sedum, which creates the grid that we can layer all the other flowers into. If you find that flowers move around on you a lot, especially with bouquets, this might be the ingredient that you're missing. Something like this, the flowers can really latch into. Because just the overlapping stems, I think, isn't quite enough sometimes. So I think it's helpful to have a flower, a structural flower, in there, as well.
So out comes the hydrangea. Now you're starting to be able to see the flower foam that it was arranged in. And, of course, with these, the purpose is to cover up that base or that structure, whatever you're using. Whether it's a frog or chicken wire or the foam. Each of those things has pros and cons to them. And you can learn more about those on the free page at Team Flower, where we go through the three different ways that you can set up an arrangement. So if you're curious about the different kinds, and pros and cons, and when to use what, you might consider watching that and chiming in with a few comments.
So, out comes the serum. And, then, all we have remaining is the pokeweed, which is what created our shape and our general-- how big we were going to get and how wide and deep. So I'll pull that out, too. And a lot of times, with this-- I'll leave this one in here, I guess-- some of these shorter pieces go in second. And I will use the longer pieces too. Those ones will go in first, to get the general shape established. And, then, these act both as a shape and then also as cover. And one little piece of spirea that I put in here.
So, there you have it. The deconstructed table arrangement. This isn't a very pretty way to end a tutorial, but it was pretty when started. So, anyway, I hope you enjoyed that. And hope that that helps you and inspires you to take the next step with your business. If you'd like to see more free videos like this, you can hop on TeamFlower.org/free. And hop on our mailing list, you'll be notified as soon as new videos are released. Thanks for watching. Have a great day.


